Mac で Karabiner-Elements を使ってファンクションキーにショートカットキー Ctrl + C を割り当てる方法

ロジクール マウス MX Master 3 を愛用しているのですが、macOS Monterey バージョン 12.1 にしてから、ホイールの挙動がおかしいので、純正マウスに戻すことにしました。

但し、アプリ毎に MX Master 3 の Back/forward ボタンにキーを割り当てています。

特に ターミナルで Back/forward ボタンにショートカットキー Ctrl + C を割り当てていました。

これがないと不便なので、カスタムキーボードなどを導入しようかと思ったのですが、キーボードのファンクションキーに割り当ててみることにしました。

2022/03/21(Mon) 12:38:36
Macでアプリケーションのキーボードショートカットを作成する - Apple サポート (日本)
https://support.apple.com/ja-jp/guide/mac-help/mchlp2271/12.0/mac/12.0

macOS 純正の機能では、アプリケーションのメニュータイトルをショートカットキーに割り当てることができます。

欲しい機能は、ファンクションキー f1 を押すと Ctrl + C を押したことになる動作です。即ち、特定のキーを押すと違うキー操作を実行するようにしたいのですが、アプリケーションのメニュータイトルをショートカットキーに割り当てることでは実現できません。

ちょうど US 配列キーボードを使っているので、Karabiner-Elements にお世話になっていました。

2022/03/21(Mon) 12:37:23
Karabiner-Elements
https://karabiner-elements.pqrs.org/
2022/03/21(Mon) 12:40:22
Use more complex rules | Karabiner-Elements
https://karabiner-elements.pqrs.org/docs/manual/configuration/configure-complex-modifications/

2022/03/21(Mon) 12:40:59
Karabiner-Elements complex_modifications rules
https://ke-complex-modifications.pqrs.org/

Table of Contents
	▼International (Language Specific)
		▼For Japanese (日本語環境向けの設定) (rev 6)
			▼コマンドキーを単体で押したときに、英数・かなキーを送信する。(左コマンドキーは英数、右コマンドキーはかな) (rev 3)

2022/03/21(Mon) 12:41:31
JSON ソース
https://ke-complex-modifications.pqrs.org/json/japanese.json

普段は、上記 Complex Modifications サイトから日本語キーバインド設定ファイル(左コマンドキーは英数、右コマンドキーはかな)をダウンロードして、英数が左コマンドキーに設定されている機能を左オプションキーに変更して使っています。

ファンクションキーの設定は、 /アプリケーション/Karabiner-Elements.app の Function keys タブで変更できますが、カスタマイズしたいので、下記 Complex Modifications サイトから

2022/03/21(Mon) 12:43:29
Karabiner-Elements complex_modifications rules
https://ke-complex-modifications.pqrs.org/

Table of Contents
	▼Modifier Keys
		▼Change Command_R Key (Right Command)
			▼Post Escape if Command_R is pressed alone.
2022/03/21(Mon) 12:44:16
JSON ソース
https://ke-complex-modifications.pqrs.org/json/change_command_l.json

Post Escape if Command_R is pressed alone. を雛形にして、ファンクションキー f1 を入力すると Ctrl + C に変更する設定ファイルを作成してみました。

2022/03/21(Mon) 13:38:48
KeyBinding.zip
https://kyoshiaki.sakura.ne.jp/blog/KeyBinding.zip

良かったら、上記リンクからダウンロードして利用してください。

使用方法は、ダウンロードした KeyBinding.zip ファイルを Finder で展開し、下記の作成されたファイルから

KeyBinding
|--ReadMe.txt
|--control_break_keybindings.json
|--bathyscaphe_and_terminal_key_bindings.json
|--japanese_option_eisuu_key_bindings.json
|--open_complex_modifications.sh
|--open_complex_modifications.scpt
|--Mac で Karabiner-Elements を使ってファンクションキーにショートカットキー Ctrl + C を割り当てる方法 – KOYAMA Yoshiaki のブログ – WordPres….webloc
|--Mac で Karabiner-Elements を使ってファンクションキーにショートカットキー Ctrl + C を割り当てる方法 – KOYAMA Yoshiaki のブログ – WordPres.url
|--LICENSE.txt

自分が使用したい拡張子が json の設定ファイルを $HOME/.config/karabiner/assets/complex_modifications/ フォルダにコピーしてください。

ターミナルで KeyBinding.zip を展開したいフォルダに移動し、

2022/03/21(Mon) 13:40:59
$ cd KeyBinding
$ ./open_complex_modifications.sh

上記のように open_complex_modifications.sh を実行すると $HOME/.config/karabiner/assets/complex_modifications/ フォルダをFinder で開くことができます。

また、KeyBinding.zip ファイルを展開して作成された KeyBinding フォルダに含まれるアップルスクリプト open_complex_modifications.scpt ファイルをダブルクリックするとスクリプトエディタが開くので、右上の実行ボタン (▶ アイコン) をクリックすると同じく $HOME/.config/karabiner/assets/complex_modifications/ フォルダを Finder で表示できます。

ファンクションキー f1 にショートカットキーCtrl + C を割り当てたいなら、control_break_keybindings.json ファイルを $HOME/.config/karabiner/assets/complex_modifications/ フォルダにコピーしてください。

2022/03/21(Mon) 13:41:48
Use more complex rules | Karabiner-Elements
https://karabiner-elements.pqrs.org/docs/manual/configuration/configure-complex-modifications/

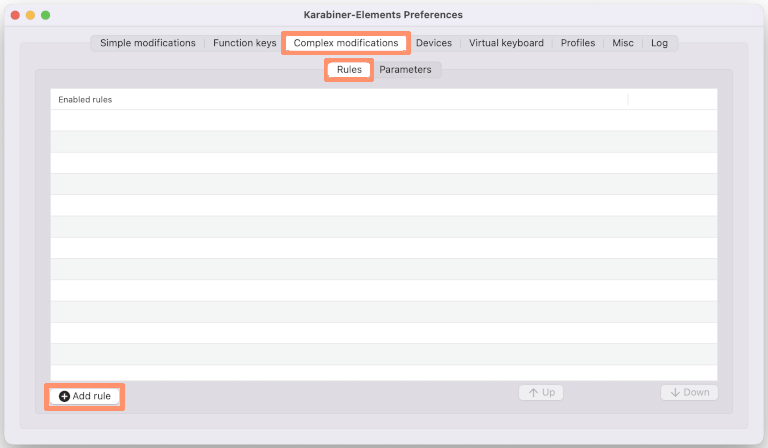
後は、上記サイトのように /アプリケーション/Karabiner-Elements.app を起動し、下図のように Complex Modifications タブ > Rules タブ > Add rule ボタンをクリックしてください。

Add rule

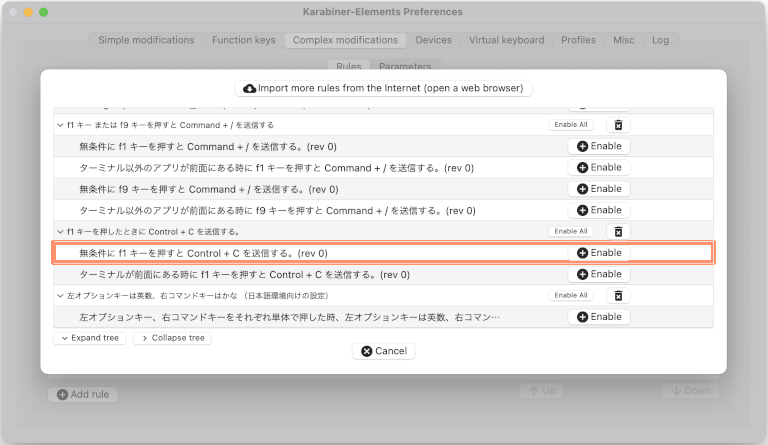
下図から “無条件に f1 キーを押すと Control + C を送信する。(rev 0)” の ‘+ Enable’ ボタンをクリックして有効にしてください。

Enable
“無条件に f1 キーを押すと Control + C を送信する。(rev 0)”

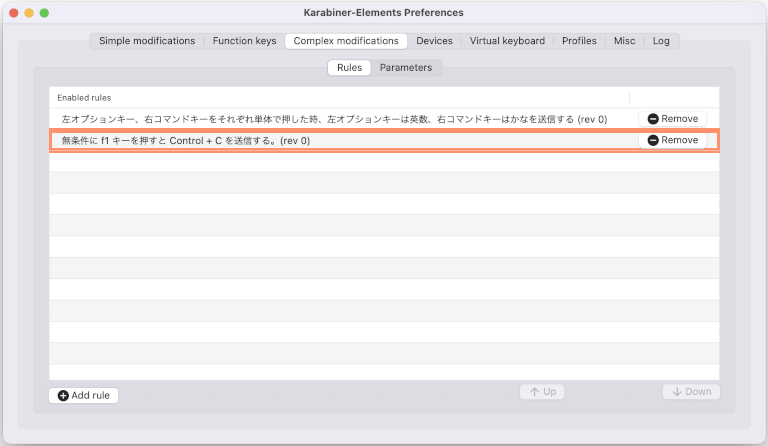
上図のように表示されれば、これで f1 キーの入力を Ctrl + C に変更できます。

しかし、自分の好みのショートカットキーを登録したくなると思います。

2022/03/21(Mon) 13:46:25
External JSON generators | Karabiner-Elements
https://karabiner-elements.pqrs.org/docs/json/external-json-generators/

2022/03/21(Mon) 13:46:50
yqrashawn/GokuRakuJoudo: config karabiner with ease
https://github.com/yqrashawn/GokuRakuJoudo#usage

2022/03/21(Mon) 13:47:16
Goku は、拡張子 clj より Closure で作られている。
GokuRakuJoudo/tutorial.md at master · yqrashawn/GokuRakuJoudo
https://github.com/yqrashawn/GokuRakuJoudo/blob/master/tutorial.md

上記ドキュメントを読むと自分で設定ファイルを作るのは、敷居が高いと思うかもしれませんが、

control_break_keybindings.json

上記ファイルのように既存の JSON 形式 設定ファイルのキーコード (key_code) や修飾キー (modifiers) の文字列を変更すれば簡単に実現できます。

2022/03/21(Mon) 13:49:28
Visual Studio Code - Code Editing. Redefined
https://code.visualstudio.com/

2022/03/21(Mon) 13:49:57
JSON editing in Visual Studio Code
https://code.visualstudio.com/docs/languages/json

Visual Studio Code で JSON 形式 設定ファイルを開けば、構文チェックもしてくれます。

設定するキー文字列も、 /アプリケーション/Karabiner-EventViewer.app を起動し、確認したいキーを押せば表示してくれます。

2022/03/21(Mon) 13:51:08
快適キーボード操作のためのキーカスタマイズ ~Mac編~ | さくらのナレッジ
https://knowledge.sakura.ad.jp/23355/

上記サイトのキーバインド設定 JSON ファイルの解説が一番参考になりました。
特に mandatory、optional の違いは、ここで理解しました。

mandatory は、キーの組み合わせを指定し 、この組み合わせが入力されたときに ”to” の処理を行う。
optional に指定したキーは、”to” の時にもキー入力が引き継がれます。

私自身、

2022/03/21(Mon) 13:52:33
Karabiner-Elements complex_modifications rules
https://ke-complex-modifications.pqrs.org/

Table of Contents
	▼Emulation Modes
		▼Emacs key bindings (rev 12)
			▼Emacs key bindings [C-x key strokes] (rev 2)

2022/03/21(Mon) 13:53:00
JSON ソース
https://ke-complex-modifications.pqrs.org/json/emacs_key_bindings.json

のソースを読んで、理解を深めました。変数を使ってショートキーを押した数を数えたり、特定のアプリだけ動作する方法を学びました。

最後に JSON 設定ファイルを作成するのに必要なドキュメントの箇所をまとめておきます。

目次

JSON 設定ファイル書式

2022/03/21(Mon) 13:56:11
complex_modifications manipulator definition | Karabiner-Elements
https://karabiner-elements.pqrs.org/docs/json/complex-modifications-manipulator-definition/
"manipulators": [
    {
        "type": "basic",
        "from": {...},
        "to": [...],
        "to_if_alone": [...],
        "to_if_held_down": [...],
        "to_after_key_up": [...],
        "to_delayed_action": {
            "to_if_invoked": [...],
            "to_if_canceled": [...],
        },
        "conditions": [...],
        "parameters": {...},
        "description": "Optional description for human"
    },
    ...
]
Name	Required	Description
type				Required	"basic" is specified
from				Required	The name of key code, consumer key code or pointing button which you want to change
to				Optional	Events which are sent when you press from key
to_if_alone		Optional	Events which are sent when you press from key alone
to_if_held_down	Optional	Events which are sent when you hold down from key
to_after_key_up	Optional	Events which are sent after you release from key
to_delayed_action	Optional	Events which are sent after 500 milliseconds at you press from key
conditions		Optional	Manipulator is applied only if condition is matched (e.g., the frontmost application)
parameters		Optional	Override parameters such as to_if_alone_timeout_milliseconds
description		Optional	A human-readable comment
2022/03/21(Mon) 13:57:49
to_if_alone | Karabiner-Elements
https://karabiner-elements.pqrs.org/docs/json/complex-modifications-manipulator-definition/to-if-alone/

2022/03/21(Mon) 13:58:14
to_if_held_down | Karabiner-Elements
https://karabiner-elements.pqrs.org/docs/json/complex-modifications-manipulator-definition/to-if-held-down/

2022/03/21(Mon) 13:58:35
from.any | Karabiner-Elements
https://karabiner-elements.pqrs.org/docs/json/complex-modifications-manipulator-definition/from/any/

Conditions

2022/03/21(Mon) 13:59:55
Conditions | Karabiner-Elements
https://karabiner-elements.pqrs.org/docs/json/complex-modifications-manipulator-definition/conditions/
Conditions
frontmost_application_if, frontmost_application_unless
device_if, device_unless
keyboard_type_if, keyboard_type_unless
input_source_if, input_source_unless
variable_if, variable_unless
event_changed_if, event_changed_unless
2022/03/21(Mon) 14:01:04
frontmost_application_if, frontmost_application_unless | Karabiner-Elements
https://karabiner-elements.pqrs.org/docs/json/complex-modifications-manipulator-definition/conditions/frontmost-application/
frontmost_application_if, frontmost_application_unless
Change an event if/unless the frontmost application is the specified application.

{
    "type": "frontmost_application_if",
    "bundle_identifiers": [
        bundle identifier regex,
        bundle identifier regex,
        ...
    ],
    "file_paths": [
        file path regex,
        file path regex,
        ...
    ]
}
Name	Required	Description
type	Required	"frontmost_application_if" or "frontmost_application_unless"
bundle_identifiers	Optional	Bundle identifier regexs such as ["^com\\.apple\\.Terminal$", "^com\\.googlecode\\.iterm2$"]
file_paths	Optional	File path regexs such as ["/Finder$"]
description	Optional	A human-readable comment
Multiple

Event

2022/03/21(Mon) 14:02:38
from event definition | Karabiner-Elements
https://karabiner-elements.pqrs.org/docs/json/complex-modifications-manipulator-definition/from/
from event definition
{
    "from": {
        "key_code": "The name of key_code",
        "consumer_key_code": "The name of consumer_key_code",
        "pointing_button": "The name of pointing_button",
        "any": "key_code or consumer_key_code or pointing_button",

        "modifiers": {
            "mandatory": [
                modifier,
                modifier,
                ...
            ],
            "optional": [
                modifier,
                modifier,
                ...
            ]
        },

        "simultaneous": [
            {
                "key_code, consumer_key_code, pointing_button or any"
            },
            {
                "key_code, consumer_key_code, pointing_button or any"
            },
            ...
        ],
        "simultaneous_options": {
            "detect_key_down_uninterruptedly": false,
            "key_down_order": "A restriction of input events order",
            "key_up_order": "A restriction of input events order",
            "key_up_when": "When key_up events are posted",
            "to_after_key_up": [
                to event definition,
                to event definition,
                ...
            ]
        }
    }
}
Name	Required	Description
key_code				Optional	Key code which you want to change
consumer_key_code		Optional	Consumer key code (media key code) which you want to change
pointing_button		Optional	Pointing button name which you want to change
any					Optional	"any": "key_code", "any": "consumer_key_code" or "any": "pointing_button"
modifiers				Optional	Specify mandatory and optional modifiers (e.g., “change control-h to delete”)
simultaneous			Optional	Specify multiple events which are pressed simultaneously
simultaneous_options	Optional	Options for simultaneous

Note
key_code, consumer_key_code, pointing_button and any are exclusive.
You have to specify one of them.

Caution
Be careful using "pointing_button": "button1" and "any": "pointing_button".
You may lose the left click button and system will be unusable.

Bundle identifier の探し方

Finder で Bundle identifier を確認したいアプリケーション (例として ‘ターミナル.app ‘ を使って解説します。) を右クリック (Ctrl + 左クリック) し

メニュー

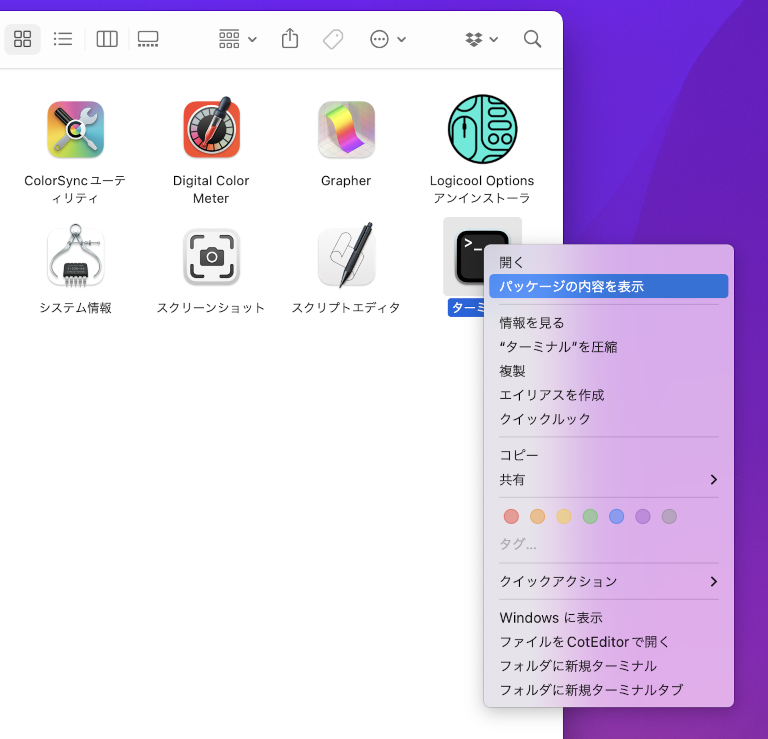
メニュー > パッケージの内容を表示 を選択

Contents

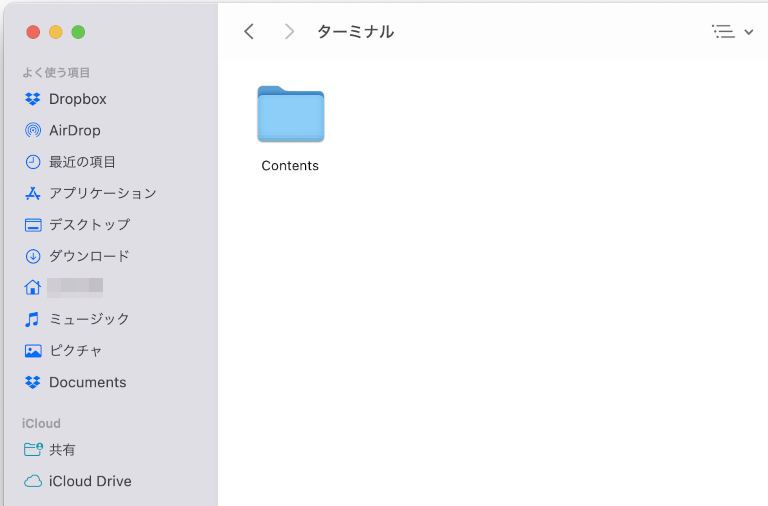
表示された Contents フォルダをダブルクリックして開く。

Info.plist

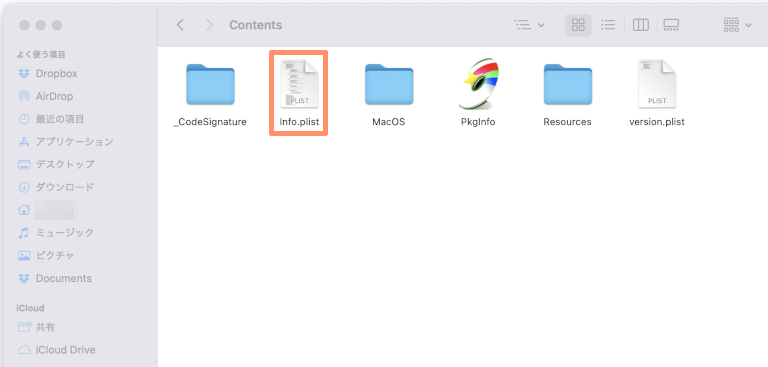
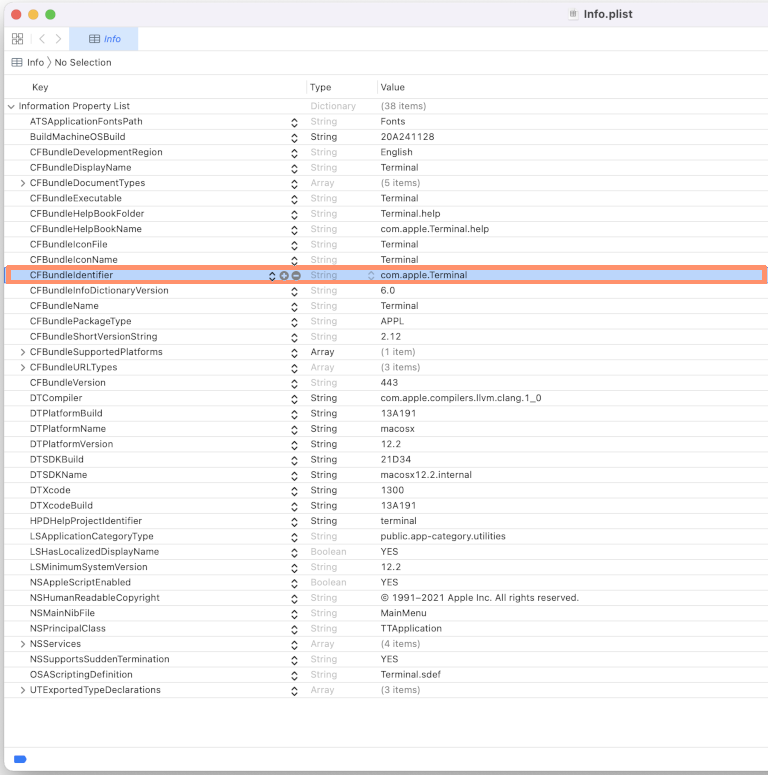
Finder 上で Info.plist ファイルをダブルクリックする。 Xcode をインストールしている場合、Xcode の property list editor で表示されます。

Xcode の property list editor

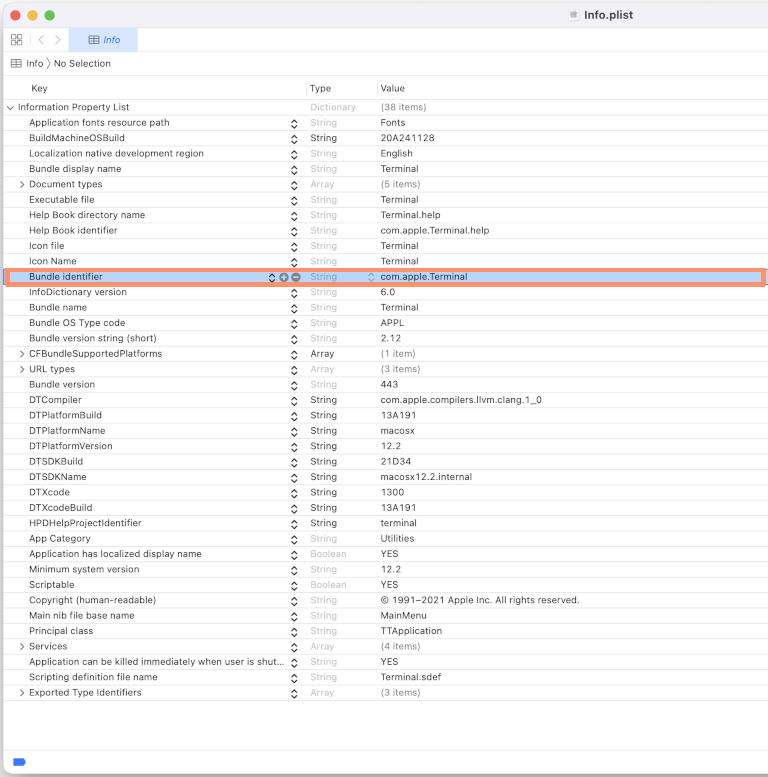
表示されたウインドウの Bundle identifier の横に表示された文字列 com.apple.Terminal が目的の値です。

Bundle identifier を raw で表示するには、

Raw Keys & Values

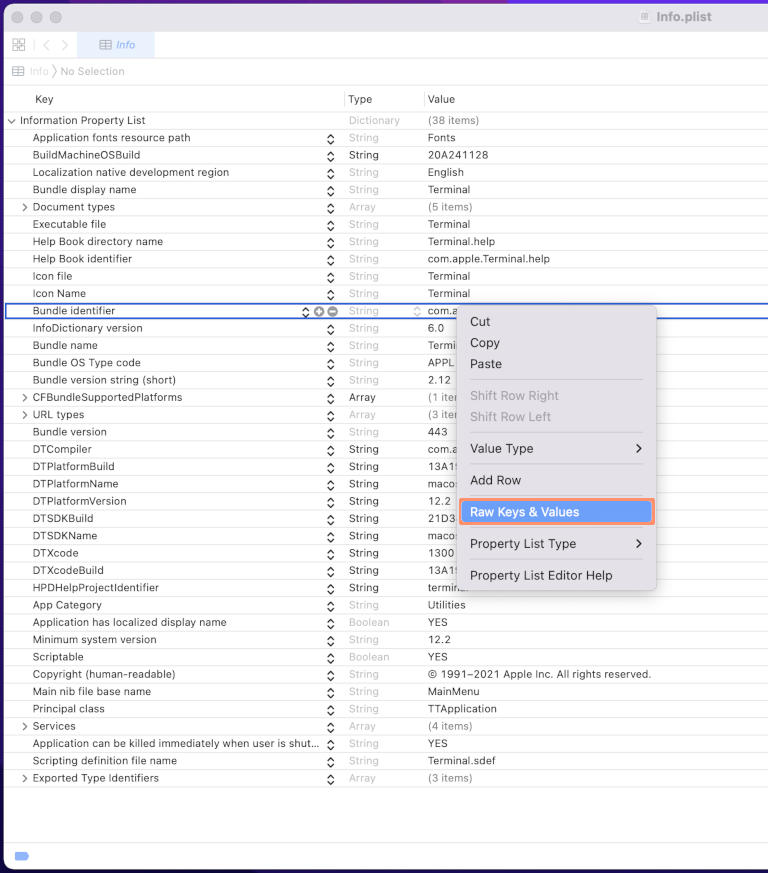
上図のように property list editor 内を右クリック (Ctrl + 左クリック) して、メニュー > Raw Keys & Values を選択すれば表示されます。

raw で表示された状態

詳細は、少し古いですが下記ページを参照してください。間違って値を変更しないように気を付けてください。

2022/03/21(Mon) 14:09:42
Edit property lists - Xcode Help
https://help.apple.com/xcode/mac/11.4/#/dev3f399a2a6

2022/03/21(Mon) 14:10:12
Xcode Help
https://help.apple.com/xcode/mac/11.4/

Parallels Desktop 11 for Mac の Ubuntu 15.10 上で Swift をビルド、example のコンパイル、GitHub にある Apple のリポジトリを全てダウンロードする自作スクリプトとコマンド git の補助スクリプト集を紹介。

以前の書き込みから随分経ってしまいました。新年を跨ぎましたが、今年も宜しくお願いします。

Swift.org - Welcome to Swift.org
https://swift.org/

Swiftオープンソースとして公開されてから、2ヶ月程経ちました。コンパイラの仕組みについては、以前から興味があったのでビルドに挑戦してみました。ただし、OS X 側の環境を汚したくないので、Parallels Desktop 11 for Mac の仮想環境で Ubuntu 15.10 をインストールして Swift をビルドしてみました。swift-package-manager を使った example のコンパイルGitHub にある Appleリポジトリを全てダウンロードするスクリプトとコマンド git の補助スクリプト集を紹介したいと思います。

最初に自作スクリプトを下記URL で公開しておきます。詳細は、アーカイブに含まれる ReadMe.rtfd ファイルとブログの後半を参考にしてください。

GitHub にある Appleリポジトリを全てダウンロードする自作スクリプトとコマンド git の補助スクリプト集。
http://kyoshiaki.sakura.ne.jp/osx/Sample/Apple.zip

Parallels Desktop 11 for MacUbuntu 15.10 の仮想環境を作成。

まず、最初に Linux ディストリビューションUbuntu 15.10 をダウンロードする必要があります。

The leading OS for PC, tablet, phone and cloud | Ubuntu
http://www.ubuntu.com/
Download Ubuntu Desktop | Download | Ubuntu
http://www.ubuntu.com/download/desktop

上記 URL から (ここでは、英語版での解説になります。)

Ubuntu 15.10
64-bit

‘ダウンロード’ ボタンをクリックして、ファイル ubuntu-15.10-desktop-amd64.iso をダウンロードしてください。

Parallels Desktop 11 for Mac を起動し、メニュー/ファイル/新規… を選び、イメージファイルとして ubuntu-15.10-desktop-amd64.iso を選択してインストールしてください。

インストールに成功したら、Ubuntu 15.10 を Software Updater で最新の状態にしてください。

Ubuntu 15.10 上で swift コマンドを実行できる環境を作成。

次に Ubuntu 上で swift コマンドを実行できる環境を作成します。詳しい解説は、

Swift.org - Download Swift
https://swift.org/download/
Linux
https://swift.org/download/#linux

を参照してください。上記 URL の

Latest Development Snapshots
Linux	Ubuntu 15.10 Swift 2.2 Snapshot (Signature) January 11, 2016

から Ubuntu 15.10 Swift 2.2 Snapshot のリンクを Ubuntu 15.10 上の Firefox などのウェブブラウザでクリックして、ファイル swift-2.2-SNAPSHOT-2016-01-11-a-ubuntu15.10.tar.gz をダウンロードしてください。さらに (Signature) のリンクをクリックして swift-2.2-SNAPSHOT-2016-01-11-a-ubuntu15.10.tar.gz.sig ファイルもダウンロードしてください。Signature ファイルはダウンロードしたファイルが改変されていないか検証するために使います。

(最新の Snapshot をダウンロードしてください。2016/01/17(Sun) 現在、Ubuntu 15.10 Swift 2.2 Snapshot (Signature) January 11, 2016 が最新です。)

Ubuntu 上で Terminal を起動し、

~ $ sudo apt-get install clang libicu-dev
~ $ 

で必要なパッケージをインストールします。

~ $ wget -q -O - https://swift.org/keys/all-keys.asc | gpg --import -

上記コマンドで公開鍵をインポートします。これは、1回だけ実行すれば良いようです。

swift-2.2-SNAPSHOT-2016-01-11-a-ubuntu15.10.tar.gz
SNAPSHOT-2016-01-11-a-ubuntu15.10.tar.gz.sig

先ほどダウンロードした上記2つのファイルをデスクトップに移動します。

~/Desktop $ gpg --keyserver hkp://pool.sks-keyservers.net --refresh-keys Swift

上のコマンドを実行した後、

~/Desktop $ gpg --verify swift-<VERSION>-<PLATFORM>.tar.gz.sig

ダウンロードしたアーカイブが改変されていないか上記コマンドで検証します。ここでは、

~/Desktop $ gpg --verify swift-2.2-SNAPSHOT-2016-01-11-a-ubuntu15.10.tar.gz.sig
gpg: assuming signed data in `swift-2.2-SNAPSHOT-2016-01-11-a-ubuntu15.10.tar.gz'
gpg: Signature made Tue 12 Jan 2016 10:02:41 AM JST using RSA key ID xxxxxxxx
gpg: Good signature from "Swift Automatic Signing Key #1 <swift-infrastructure@swift.org>"
gpg: WARNING: This key is not certified with a trusted signature!
gpg:          There is no indication that the signature belongs to the owner.
~/Desktop $ 

上記コマンド gpg –verify swift-2.2-SNAPSHOT-2016-01-11-a-ubuntu15.10.tar.gz.sig になります。gpg: Good signature と表示されれば良いようです。ただし、警告が表示されています。どこか間違っているのかもしれません。

~/Desktop $ tar xzf swift-2.2-SNAPSHOT-2016-01-11-a-ubuntu15.10.tar.gz

コマンド tar を使って上記のように swift-2.2-SNAPSHOT-2016-01-11-a-ubuntu15.10.tar.gz を展開します。

swift コマンドのパスを環境変数 PATH に設定します。ホームディレクトリの .profile ファイルは、.bashrc ファイルを読み込んでいます。.bashrc ファイルの最後に

export PATH=$HOME/Desktop/swift-2.2-SNAPSHOT-2016-01-11-a-ubuntu15.10/usr/bin:"${PATH}"

emacsvim、vi などのエディタを使って追加します。Terminal を再起動し、

~ $ swift --version
Swift version 2.2-dev (LLVM 3ebdbb2c7e, Clang f66c5bb67b, Swift 42591f7cba)
Target: x86_64-unknown-linux-gnu
~ $

上記のように swift コマンドで実行できるか確認できます。

swift-package-manager を使った example のコンパイル

Apple · GitHub
https://github.com/apple/
GitHub - apple/example-package-dealer: Example package for use with the Swift Package Manager
https://github.com/apple/example-package-dealer

上記の example の大元は example-package-dealer です。依存関係はパッケージマネージャーが面倒を見てくれます。

~/Desktop $ git clone https://github.com/apple/example-package-dealer.git
Cloning into 'example-package-dealer'...
remote: Counting objects: 18, done.
Unpacking objects: 100% (18/18), done.
remote: Total 18 (delta 0), reused 0 (delta 0), pack-reused 18
Checking connectivity... done.

上記のように git clone コマンドで example-package-dealer リポジトリをダウンロードし、

~/Desktop $ cd example-package-dealer/
~/Desktop/example-package-dealer $ swift build
Cloning https://github.com/apple/example-package-deckofplayingcards.git
Using version 1.0.2 of package example-package-deckofplayingcards
Cloning https://github.com/apple/example-package-fisheryates.git
Using version 1.0.2 of package example-package-fisheryates
Cloning https://github.com/apple/example-package-playingcard.git
Using version 1.0.1 of package example-package-playingcard
Compiling Swift Module 'FisherYates' (1 sources)
Linking Library:  .build/debug/FisherYates.a
Compiling Swift Module 'PlayingCard' (3 sources)
Linking Library:  .build/debug/PlayingCard.a
Compiling Swift Module 'DeckOfPlayingCards' (1 sources)
Linking Library:  .build/debug/DeckOfPlayingCards.a
Compiling Swift Module 'Dealer' (1 sources)
Linking Executable:  .build/debug/Dealer
~/Desktop/example-package-dealer $ 

example-package-dealer ディレクトリに移動した後、 上記のように swift build コマンドを実行します。

実行ファイルは .build/debug に作成されます。

~/Desktop/example-package-dealer $ cd .build/debug
~/Desktop/example-package-dealer/.build/debug $ ./Dealer
♠︎Q
♣︎3
♠︎8
♢4
♣︎Q
♢6
♢J
♡2
♡5
♠︎J
~/Desktop/example-package-dealer/.build/debug $ 

上記が実行結果です。

Ubuntu 15.10 上で swift コマンドをビルドする。

Ubuntu 15.10 上で Terminal を起動し、

~ $ sudo apt-get install git cmake ninja-build clang python uuid-dev libicu-dev icu-devtools libbsd-dev libedit-dev libxml2-dev libsqlite3-dev swig libpython-dev libncurses5-dev pkg-config

を実行してください。

Apple · GitHub
https://github.com/apple/
GitHub - apple/swift: The Swift Programming Language
https://github.com/apple/swift

から Swiftリポジトリを Ubuntu15.10 デスクトップ上の Apple という名前のフォルダに

~ $ cd Desktop/
~/Desktop $ mkdir Apple
~/Desktop $ cd Apple/
~/Desktop/Apple $ git clone https://github.com/apple/swift.git
Cloning into 'swift'...
remote: Counting objects: 324410, done.
remote: Compressing objects: 100% (156/156), done.
remote: Total 324410 (delta 62), reused 0 (delta 0), pack-reused 324254
Receiving objects: 100% (324410/324410), 68.43 MiB | 5.43 MiB/s, done.
Resolving deltas: 100% (265946/265946), done.
Checking connectivity... done.
~/Desktop/Apple $ ls
swift
~/Desktop/Apple $

上記コマンド git clone https://github.com/apple/swift.git を使ってダウンロードします。

Swift のビルドの仕方の詳細は、

~/Desktop/Apple/swift/README.md

に書いてあります。(後で、AppleGitHub 上のリポジトリを全てダウンロードするスクリプトを紹介します。そのスクリプトOS X 上で実行し、Finder 上で Apple/swift/README.md ファイルをダブルクリックすると Xcode で Markdown 形式のファイルを見ることができます。)

追記) 2016/03/09(Wed)
Markdown 記法ファイルの表示、編集には下記 URL の Atom エディタを使うのが一番簡単です。

Atom
https://atom.io/

Markdown の表示は、Markdown ファイルを開き、

ショートカットキー: ctrl-shift-M
コマンド: Markdown Preview:Toggle

で表示できます。

Split Pane だと扱いにくいので
Settings/Packages の Package: markdown-preview をクリックして、設定画面を表示し、Open Preview In Split Pane のチェックを外してください。別 Pane に表示されるようになります。

~/Desktop/Apple $ cd swift
~/Desktop/Apple/swift $ ./utils/update-checkout --clone
--- Cloning 'cmark' ---
--- Cloning 'lldb' ---
--- Cloning 'llvm' ---
--- Cloning 'swift-corelibs-xctest' ---
--- Cloning 'swift-integration-tests' ---
--- Cloning 'swiftpm' ---
--- Cloning 'swift-corelibs-foundation' ---
--- Cloning 'clang' ---
--- Cloning 'llbuild' ---
~/Desktop/Apple/swift $ 

上記コマンド ./utils/update-checkout –clone を使って必要なパッケージをダウンロードします。(swift フォルダではなく、Apple フォルダに保存されので注意してください。)

最後に ./utils/build-scrip スクリプトを実行して swift コマンドをビルドします。引数 -R を指定しない限り debug モードでビルドされます。引数 -R の場合 release モードになります。引数 -t は Ninja による基本的なテストを行います。

詳しい解説は

~/Desktop/Apple/swift $ ./utils/build-script -h

を参照してください。環境変数 SWIFT_SOURCE_ROOT(ソースの位置)、SWIFT_BUILD_ROOT(swift が作成される位置) を設定できます。設定されていない場合、推論されます。

実際に ./utils/build-script -t でビルドすると

~/Desktop/Apple/swift $ ./utils/build-script -t
.
.
libLLVMSupport.a -lrt -ldl -ltinfo -lpthread -lm -Wl,-rpath,"\$ORIGIN/../lib" && :
clang: error: unable to execute command: Killed
clang: error: linker command failed due to signal (use -v to see invocation)
[1121/1984] Linking CXX executable bin/llvm-ar
ninja: build stopped: subcommand failed.
./utils/build-script: command terminated with a non-zero exit status 1, aborting
~/Desktop/Apple/swift $ 

上記エラーによりビルドに失敗します。メモリが足りないと表示されるようです。

図 1) 構成…/ハードウェア/CPU および メモリ

Parallels Desktop 上で、メニュー/処理/構成… を選び 、’ハードウェア’ タブを選択し、上図のように Ubuntu 側のメモリを 8192MB に変更します。

また、メモリを節約する意味で、引数 -j 1 を指定して、ビルドプロセスを1つにします。最終的に

~/Desktop/Apple/swift $  time ./utils/build-script -j 1 -t

上のコマンドを実行します。(time コマンドはビルド時間を計測してくれます。)

私の MacBook Pro の動作環境は

OS X El Capitan バージョン 10.11.3
MacBook Pro (Retina, 15-inch, Late 2013)
プロセッサ 2.3GHz Intel Core i7
メモリ 16GB 1600 MHz DDR3
グラフィクス
Intel Iris Pro 1536 MB
NVIDIA GeForce GT 750M
Parallels Desktop 11 for Mac
バージョン 11.1.2 (32408)
~/Desktop/Apple/swift $  time ./utils/build-script -j 1 -t
-- check-swift-linux-x86_64 finished --
--- Finished tests for swift ---
real	108m35.712s
user	112m17.964s
sys	4m48.860s
~/Desktop/Apple/swift $ 

です。上記のように time コマンドで確認するとビルドに1時間40分ほどかかりました。

ビルドした swift コマンドの位置は、

~/Desktop/Apple/build/Ninja-DebugAssert/swift-linux-x86_64/bin/swift

にあります。

最後にOS X 上で使用する自作スクリプトを紹介したいと思います。

GitHub にある Appleリポジトリを全てダウンロードする自作スクリプトとコマンド git の補助スクリプト集。

GitHub にある Appleリポジトリを全てダウンロードする自作スクリプトとコマンド git の補助スクリプトhttp://kyoshiaki.sakura.ne.jp/osx/Sample/Apple.zip

上記 URL で GitHub にある Appleリポジトリを全てダウンロードする自作スクリプトとコマンド git の補助スクリプト集を公開します。

ダウンロードした Apple.zip をデスクトップに移動し、Finder 上でダブルクリックして展開します。コマンド install.sh を

~/Desktop/Apple $ ./install.sh
Cloning into 'swift'...
Cloning into 'swift-package-manager'...
.
.
~/Desktop/Apple $ 

上記のように実行すると、GitHub にある Appleリポジトリを全てダウンロードします。すべてのリポジトリを最新の状態にアップデートしたい場合は update.sh を使用します。

~/Desktop/Apple $ ./log.rb
0: example-package-dealer
1: example-package-deckofplayingcards
2: example-package-fisheryates
3: example-package-playingcard
4: swift
5: swift-3-api-guidelines-review
6: swift-clang
7: swift-cmark
8: swift-corelibs-foundation
9: swift-corelibs-libdispatch
10: swift-corelibs-xctest
11: swift-evolution
12: swift-integration-tests
13: swift-llbuild
14: swift-lldb
15: swift-llvm
16: swift-package-manager
?
4

上記のように log.rb を実行するとリポジトリ一覧を表示し、番号を入力することで選択したリポジトリのコミットログを表示することができます。次ページを見るには、スペースキーを押してください。カーソル上下キーでもスクロールできます。終了するには、q キーを押してください。その他のスクリプトは、Apple/Dcuments フォルダの ReadMe.rtfd を参照してください。

2ch Script version 0.3

利用している人はいないと思いますが、以前 [ id:KYoshiaki:20081026 ] 紹介した iPhoneiPod touchSafari 対応 2ch Script version 0.3 [ hhttp://kyoshiaki.sakura.ne.jp/osx/leopard.html ] を公開します。

時間がとれないので、厳密に動作確認をおこなっていません。問題があるかもしれません。コメント設定を許可にしておきます。だだし、コメントは承認後に公開されます。時間がとれる限り返事はするつもりですが、遅くなると思います。

ブログには書いていませんでしたが、随分前に値段は高かったのですが DS 版 Chessmaster: The Art of Learning を購入していました。

ニンテンドーDSi にリージョンプロテクトがないので、問題なく動作します。私自身めちゃくちゃ弱いのですが ELO レーテイングをこつこつあげています。

また iPod touch 用に iTunes StoreApp Store から

iChess (Free)
カテゴリ/ゲーム
無料
http://itunes.apple.com/WebObjects/MZStore.woa/wa/viewSoftware?id=298074242&mt=8

をダウンロードして遊んでいたのですが、結構勝てそうなので

iChess
カテゴリ/ゲーム
\115
http://itunes.apple.com/WebObjects/MZStore.woa/wa/viewSoftware?id=292985696&mt=8

を購入してみました。レベルをちょっと下げてみたら勝てたので驚いています。iChess はあまりにも機能がシンプルなので他のチェスソフトを物色中です。

また、将棋ソフトが発売されるのを待ち望んでいました。

柿木将棋
カテゴリ/ゲーム
\450
http://itunes.apple.com/WebObjects/MZStore.woa/wa/viewSoftware?id=301163765&mt=8

とうとう、柿木将棋が発売されました。早速購入しました。勝てた時はうれしかったですね。レベルは内緒ですが!

あと前々回 [ id:KYoshiaki:20081207 ] 紹介した自作 iPhoneiPod touch 用アプリ iYKRSS や Safari を使ってウェブブラウジングしているのですが、わからない英単語を見つけた時、以前のように一度 Safari を終了して i英辞郎 で調べるのではなく、ニンテンドーDSi ‘漢字そのまま DS楽引辞典‘ で調べられるのは便利ですね!本当は iPod touchiPhone の両方があればよいのですが!